Disk replacement on a Powerbook G4
Nov 5, 2023
In October 2003, I made my first leap into using an Apple device. For quite some time I’d been trying to find a reasonable and portable machine for daily use, and I had slowly gotten frustrated with the current offerings by Dell, HP, and other major laptop manufacturers. In the hunt for something new, I picked a Powerbook G4 12". This machine was my daily workhorse for several years and at the end of its life, it was stuffed into a draw and forgotten about. Sometime around 2014 when I was purchasing a new Macbook Pro I decided to grab my old laptop out of storage and get it booted to hopefully pull a few files from the system. I had lost the power adapter and (obviously) the battery had given up. I purchased a new power adapter on eBay and ended up throwing everything back in the drawer to sort out another day.
Roll on to 2023, in the Leigh Hackspace Slack a fellow member was discussing his newly acquired iBook G4. I was reminded about my poor Powerbook that had been left unloved in a draw for close to a decade, I found all the parts and powered it up only to be confronted with the sound of screeching metal and clicking. The internal disk had given up. This model of Powerbook runs on a 2.5" IDE disk, usually manufactured by Toshiba, and is not one of the usual brands that would fail horribly. After a few moments of poking it did seem that either the bearings or motor was damaged. If I wanted a working system then I’d need to replace it.
iFixit rates a hard drive replacement in these systems as ‘Difficult’, and I walked into this thinking it wouldn’t be that hard. As it turns out, you can respect the modern repairability of most systems after looking at this, even just having a standard set to screws alone would be a huge improvement!
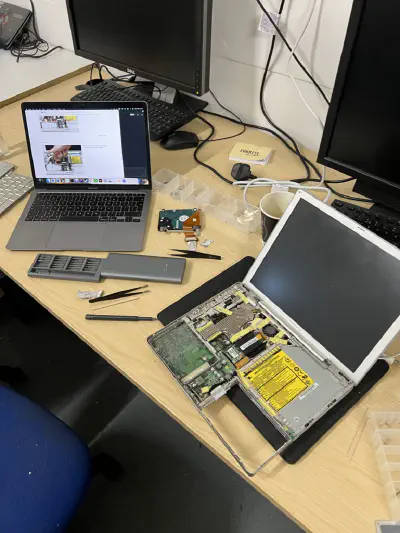
The initial disassembly took about an hour, and most of that time was spent trying to get the top case to release from the tiny plastic clasps on the inside of the case. Lots of tape, sensitive connections that can snap at a moment’s notice, and again more screws to finally get to the hard drive within.
The replacement hard drive I purchased was a ‘Bingogo 2.5" IDE 128GB’. Chris, the member with the iBook G4, had chosen to buy a cheaper mSATA to IDE converter to replace his iBook drive and when my drive turned up it just turned out to also be a mSATA converter with a disk included.
Chris has come prepared. In advance of reinstalling his device, he had downloaded a community-created full disk image of a working Leopard (10.5) install. He was able to write the image onto my drive, saving me from having to fight with physical media and a long installation process. After cobbling together a working system I hit the power for the first time and crossed my fingers. Initially, it looked like the image didn’t work. The useful ‘folder with a question mark’ appeared, but at least it was better than when the faulty hard drive was in it. After a little bit of research on Google, we came across the Openfirmware Wiki on MacRumors, which at least got us to a prompt that we could start investigating what was going on.
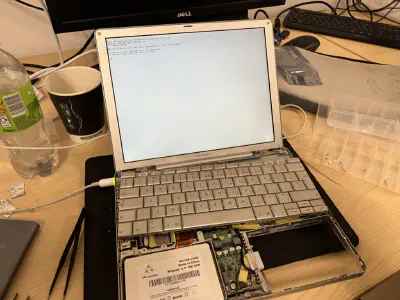
After a little exploring, we found the disk was working and we were able to browse the file structure. The mirroring of the image was a success but it wasn’t picking the new hard disk as its boot source. The hints we needed were found on the MorphZone Openfirmware page.
A quick dir hd:,\ gave us a list of files on the file systems. printenv showed the Openfirmware configuration options. The most important one here is boot-device showing what disks are configured as a first attempt at booting. In this instance, it looked correct, but obviously wasn’t working. The next attempt was to boot the OSX install on the disk, by calling the ‘BootX’ file from Openfirmware we should be able to get the system started.
boot hd:,\System\Library\CoreServices\BootX
hd: needs to be replaced with the disk or partition you’re using, so if you have a single disk partition like the image I used it would be hd:, but if you have multiple partitions then it’ll be hd:1 and so on.
Once booted into Mac OSX you can use the ‘Startup Disk’ tool in the settings to configure the boot device. After changing the disk in there the boot-device value changed to hd:,\\:tbxi and all future boot attempts from Openfirmware worked fine using that.
So after a full day in the hackspace, I now have my Powerbook G4 back in a working condition. It’s been great to experience my first-ever laptop back in its native environment, even if it hasn’t aged well.